The Educators' Spin On It
Learning Games and Activities
By The Educators Spin On It

Germination Science Experiment

In this twist on the classic germination science experiment, children will test the germination rate of 10 green bean seeds. From making predictions to collecting data, your little scientists will learn all about seeds and how plants grow.
Let’s get started with this germination of seeds activity!

Affiliate links to products like the super cute Melissa & Doug Sunny Patch Tootle Turtle Tote Set pictured in the above picture!
An Easy Germination Science Experiment for Kids to Do
A fun way to teach your child about the germination of seeds!
Materials Needed for Germination Science Experiment
- Plastic baggie
- Black permanent marker
- Paper towel
- Spray Bottle
Directions for Germination Science Experiment
Before the germination science experiment read seed books and talk about seeds.
Introduce the word GERMINATION. Germination is when the seed begins to grow a root and a shoot. This experiment will allow children to see how and how many seeds germinate. The plastic bag acts as a window into the world of plant growth!
- Fold the paper towel so it will fit neatly inside the plastic bag.
- Using a black permanent marker, draw a 10 frame on the bag.
- Fill the spray bottle with water and let children mist the paper towel until it is completely moist.
- Place the wet paper towel in the bag.
- Have the children place one bean seed in each compartment in the 10 frame.
- Close the bag and set it flat near a window or other sunny area. (the bag can be taped to a window, but the seeds do not stay in the 10 frame well!)
TIP: Here are the Fastest Growing Seeds for Science Projects .

Want to expand this lesson? Use this free plant life cycle worksheet !
Discussion Questions for Germination Science Experiment
Do you think that all 10 bean seeds will germinate? Explain your answer.
MATH CONNECTIONS:
- Write a prediction on how many bean seeds you believe will germinate. You many guess numbers between 0 and 10. After plants have germinated check your predictions. Discuss the results.
- Can you figure out the percentage or germination rate of your bean seeds? Take the number of bean seeds in your bag that germinated. Use a calculator and times that number by 10. If 8 seeds germinated, you would take 8 x 10 = 80. Your seeds would have an 80% germination rate.
Why do you think knowing a seeds germination rate would be helpful to a farmer?
NOTE: Bean seeds germinated in this way “may” grow if you place them in a soil garden area shortly after germination begins. Often teachers will allow the bean plants to continue growing until leaves form so that students can see the plants growing.
Bean Seed Germination Experiment
Facts about Beans
- A bean seed will grow into a bean plant.
- The plant will produce blossoms that will turn into beans. If left to mature. The beans will contain 5-6 bean seeds that can be re-planted.
- Some bean seeds are white, red, brown, or black. We have even planted red speckled bean seeds.
- The roots and stem will come out of the seed. When this happens, it is called – germination.
- Roots go down from the bean seed into the earth due to gravity. They help the bean plant absorb water and nutrients from the soil. You will see this in the first few days of your grow a bean maze experiment.
- Even if you plant the seed upside down, the roots will “turn themselves” back the right way.
- The stem, or shoot, will go upwards in search of sunlight and air.
Germination Science Experiment Vocabulary
Germination : when the seed begins to grow a root and a shoot.
Root : Part of the plant beneath the soil that absorbs water and nutrients.
Sprout : the beginning growth of a plant
Sprouting : the practice of germinating seeds
We all know that plants need water, sun, and soil to grow. In this science experiment, kids will grow a bean maze to truly “see” how plants will seek out what they need.

Seed and Flower Activities for Kids
More SEED and Flower Inspired Learning Activities from our Teach ECE Education Team and here at The Educators’ Spin On It. We recommend:
- Tracing Letters with Seeds by Mom Inspired Life
- Flower Scavenger Hunt Mini-Book by Life Over C’s
- Growing Seeds and Journaling by Learning 2 Walk
- Song About Weeds by Capri + 3
- Printable Seed Activities Inspired by The Tiny Seed by Eric Carle
- Gardening with Kids, Seeds versus Transplants
- Saving Sunflower Seeds
- Best Flowers to Plant to Attract Butterflies
- Unlocking the Mysteries of Seed Germination

Click for more Gardening with Kids
Like this idea? Pin for later or share now with a friend!
- Pinterest 56
- Facebook 118

June 17, 2016 at 5:52 am
The blog is very nice and shares great information. keep up the good work. school franchise in india

April 20, 2016 at 9:19 am
Our kids would love to try this experiment. I love that they can also try multiplication with a calculator to find out the rate of germination.
You Might Also Like

Back to School STEM Activities

Back to School Resources for Parents

16 Adorable First Day of School Books

Meet the Teacher Tips for Parents

Why You Should Be Using Beginner Pencils for Handwriting Practice
Let’s connect.

Get Your ALL ACCESS Shop Pass here →
Seed Germination Experiment
Watching seeds grow is an amazing science project for kids. Our seed germination experiment allows kids to see up close to how a seed grows and what would actually be happening under the ground! Learn about the steps of seed germination, and investigate what conditions a seed needs to germinate. Make sure to grab the free printable bean life cycle activity to go with your seed jar. Easy science experiments are great for kids of all ages!

Germinate Seeds For Spring Science
This simple to set up seed jar is one of our favorite spring science projects that you can do inside! We had an awesome time examining and observing the growth of our seed germination experiment.
Share an inside look at how seeds grow below the ground with our seed jar. Plus, you can even get it started when there’s is still snow on the ground. Especially if you are itching for spring to come early!
It all starts with a single seed!

Watching how a seed grows and using a mason jar gives you a front-row seat for observing it all! Sprouting seeds is perfect for a spring STEM activity !
Another fun way to sprout seeds, especially at the end of winter, is with a mini greenhouse made from plastic bottles.

What Is Seed Germination?
First, let’s learn a bit more about germination. Seeds grow into a new plant through a process called germination. Germination is the sprouting of the seed or the very beginning of plant growth.
The absorption of water, cold temperatures or warm temperatures, oxygen availability, and light exposure may all be a factor in starting germination or keeping the seed dormant. What conditions are needed for germination will vary between plants, as each has adapted to the biome in which they live.
Learn more about biomes around the world.
Stages of Seed Germination
First, the seed absorbs water. This causes the seed to swell and the outer coating to break. Then the seed starts to break down some of the food that is stored in it. Most seeds will need oxygen in the air in the soil for this to happen.
Eventually, when the seed has grown leaves it can make its own oxygen and absorb carbon dioxide through photosynthesis .
Once the seed coat breaks open, the first root grows, called the radicle. In almost all plants, the root comes before the shoot.
Once the root starts to grow, it can now absorb water and nutrients from the soil, instead of getting it from the seed coat.
After the root, the plant’s stem starts to grow. When it reaches above the ground, the leaves begin to grow. This is when the plant no longer has to rely on the stored starch (cotyledon) that comes from the seed.
You might also try a simple greenhouse-in-a-bottle model !

Seed Germination Ideas
This simple seed experiment is a great introduction for preschoolers to growing plants , and a fun plant experiment for older kids to investigate what conditions seeds need to germinate.
Older kids can use a science experiment worksheet to write down their observations about how the seeds are growing. While young kids can draw or observe the changes!
There are so many fun questions you can ask…
- Do seeds need light to germinate?
- Does the amount of water affect seed germination?
- Do different types of seeds germinate under the same conditions?
- Does salt water affect seed germination?
Explore how fast different seeds germinate by comparing different kinds of seeds under the same conditions. We tried sunflower seeds, peas, and beans in our seed jar.
Or keep the type of seed the same and set up two mason jars to explore whether seeds need light to germinate. Place one jar where it will get natural light and one in a dark cupboard.
Another idea is to investigate whether seeds need water to germinate and how much. Set up three jars, and measure out how much water goes into each so that one is fully wet, half wet and one has no water.
Read more about the scientific method for kids and using variables in science experiments!
Bean Life Cycle Mini Pack (Free Printable)
Extend the learning of this hands-on project with this free bean life cycle mini pack !

How To Germinate Seeds Faster
One easy way to get your seeds to germinate faster is to presoak them in a shallow container of warm water for up to 24 hours. That will soften the hard outer shell of the seed. Don’t soak for longer as they may go moldy!
Seed Germination Lab
- Paper Towels or cotton wool
- Seeds (see our suggestions above)
Also check out our list of other fun science experiments you can in do a jar! >>> Science in a Jar
H ow To Set Up Your Seed Experiment
STEP 1: Fill the jar with paper towels. Kids can fold them and push them down into the jar. This is also great work for little hands.
STEP 2: Gently water your seed jar to wet the paper towels. DO NOT FLOOD IT!

STEP 3: Carefully push seeds down into the paper towels around the edge of the jar so they can still be seen. Make sure they are firmly held in place.
Our mason jar below includes sunflower, pea, and green bean seeds!

STEP 4: Put your jar in a safe place, and check in regularly to observe any changes.
How To Observe Seed Growth
This activity makes a great plant science fair project for multiple ages. Get your magnifying glass out and check out all the angles of the seeds. Can you find the different stages of seed germination described earlier?
What do you see in your seed jar?
- You are looking for a root to pop out of the side.
- Next, you are looking for a root to push down into the soil.
- Then, you are looking for root hairs.
- Next, look for the seed to push up while the root hairs push down.
- Lastly, you are looking for the shoots to come up!
The mason jar gives a stunning view of this seed experiment! My son loved being able to see the changes so easily.

Our Seed Experiment Results
We started this experiment and within a few days started to see some exciting things. It was also interesting to talk about what was happening with the different seeds and how they changed over the duration of the experiment.
- Sunflower seeds were the fastest to pop a root but never made it out of the jar.
- Bean seeds took the longest to pop a root but finally did and made it out of the jar.
- Pea seeds grew rapidly once the root popped out and grew the tallest.
Simple beginnings with the sunflower seeds! Then the pea and lastly the bean! It took about three days to see some action with the seeds!

Amazing to see the pea take off in the seed jar once the root popped out! My son enjoyed telling me about the root hairs he could see every day! So fun to see it flourish and check out the results! It’s a perfect spring science activity at home or in the classroom.
We also enjoyed the book, How A Seed Grows by Helene Jordan which inspired another seed planting activity with eggshells !

More Fun Plant Activities For Kids
Looking for more plant lesson plans? Here are few suggestions for fun plant activities that would be perfect for preschoolers and elementary kids.
Learn about the apple life cycle with these fun printable activity sheets!
Use art and craft supplies you have on hand to create your own parts of a plant craft .
Learn the parts of a leaf with our printable coloring page.
Use a few simple supplies you have on hand to grow these cute grass heads in a cup .

Grab some leaves and find out how plants breath with this simple plant experiment.
Learn about how water moves through the veins in a leaf.
Find out why leaves change color with our printable lapbook project.
Watching flowers grow is an amazing science lesson for kids of all ages. Find out what are easy flowers to grow!
Use this seed bomb recipe and make them as a gift or even for Earth Day.
Learn about osmosis when you try this fun potato osmosis experiment with the kids.
Explore the different plants that you find in our biomes of the world lapbook project.

58 Comments
This is what we should have done – instead we tried plastic bags to grow the seeds in, and they got foggy with condensation so it was hard to see the root! Aw, well. Lesson learned. Next time – grow them in a jar! lol!
We just started our beans in a jar last week. Looking forward to seeing what happens this week.
We’ve just done the same 🙂 Put the beans in the jar instead plastic bags 🙂 Mr Frog is so excited observing the bean growing!
Wonderful learning activity! Thanks for linking up at the Thoughtful Spot Weekly Blog Hop!
My girlie is very curious about planting and asks tons of questions about the seeds and what happens with them in the soil. This is a great way to show her clearly enough the whole process of the seed’s growing. Thank you for this idea!
What kind of pea seeds did you use?
Good question. I don’t remember the band or name but it was a common package from the store.
This looks like so much fun! Can’t wait to try with my 4 and 2 year old son and daughter. We’re always looking for affordable, educational and fun activities. This is perfect. Happy to have stumbled onto this site!
Do you cover the jar? Do they need to be near a sunny window? Are you supposed to water them? Thanks!
Wonderful! Thank you!
Hi! I did not cover the jar. They were on a table in front of window that did get sunlight at some point during the day. We did not water daily. I added a tiny bit here and there but not much at all. We actually went away for a week and came back to them being so tall which you can see in the picture above. Thats a week with no water what so ever!
What kind of beans did you use? Pinto? I’m wanting to start this activity here soon with my little in-home daycare. 🙂
We used green beans, sunflowers, and green peas!
Just double checking no soil, just paper towels. This is our spring break project. I can’t wait.
Right no soil!
hello! I’m going to try this with my kindergarten class. Did you use dried green beans infrom a bag (like at the supermarket)? Or fresh ones?
Where did you get your seeds? Did you buy them fresh and pick the seed out off the pods or take it out of the shell? I’m interested in doing this but I don’t want to buy the wrong ones.
Simple seed packets from the grocery store!
that was so cool
What a great learning activity. I am featuring this with a link on my blog.
We are getting ready to start this project today with our preschool class. One thing i have not been able to find is, how much water/how wet do the paper towels need to be?’
super cool!!!
- Pingback: Alternative Slime Recipes Borax, Laundry Detergent, and Fiber
- Pingback: 10 Fun Spring Activities for Kids - The Exhausted Mom
U just use dried peas you get in a box steep them over night then plant them absolutely excellent outcome 4 kids and grown ups alike lol
Interesting! Share a picture!
- Pingback: Spring Science Ideas with Family Fun Friday!
you teach me something thanks very much.
- Pingback: 12 Sensational Spring Activities for Kids! – The Homeschool Resource Room
- Pingback: Super Fun Spring Activities Your Kids Will Go Crazy Over!
- Pingback: Celery Osmosis Science Experiment and Demonstration for Kids Biology
- Pingback: Preschool Earth Day Activities Science and Sensory Play
- Pingback: Celebrate the Season with These 5 Easy Spring Crafts - Learning Liftoff
- Pingback: 20 Engaging STEM Activities for Kids to Do This Spring
- Pingback: Hydroponics For Kids- What, Why, And How | Family Focus Blog
- Pingback: 10 + Super Fun Earth Day Crafts - Mamma Mode
- Pingback: Earth Day Activities Earth Day STEM for Kids
- Pingback: 50+ STEM Activities, Books, Games, & More for Kids | Faithful Farmwife
- Pingback: 25 AWESOME EARTH DAY ACTIVITIES FOR KIDS
- Pingback: 21 Best Science Fair Projects To Try - Fun with Mama
- Pingback: 21 Best Science Fair Projects - Fun with Mama
- Pingback: Earth Day STEM Activities and Challenges for Kids
- Pingback: 5 Fun DIY Recycled Crafts - Learning Liftoff
- Pingback: Spring Flowers Books & Activities for Preschoolers
besides seed jar science is there anything else that kids can do?
What do you mean? Feel free to email me [email protected]
- Pingback: 21 Experiments for Summer Science Learning Activities for Kids | MilKids Education Consulting
I cant wait to try this out with the 4 year old children at the our Early Learning Centres I am grateful to have found this page. Thank you so much.
At any point do you add soil to the jar or transfer the plant out so it can grow bigger? If transferring, what’s the best way to move them out of the jar and into a pot? What stage of growth should they be at before doing so? Does this method work for any type of seeds? This is perfect for the plant project I want to start with my in-home daycare but I wanted to use seeds from foods they eat and can replant as a way of incorporating recycling into the other lessons learned but I’m new to all of this including being a first time mom/in-home daycare owner and have lots of questions lol! Thank you in advance for your time, patients, and wisdom! 🙂
You could potentially transfer it! We did not. You wouldn’t add soil to the jar though. Makes a great experiment to see if it takes outside or in a pot!
- Pingback: 10 Fall Toddler Activities - A Blossoming Life
- Pingback: 25 Spring Science Experiments for Kids
- Pingback: Homeschooldaze: “Seed Jar Science Experiment for Spring STEM Activities with Kids” – Darlene's Homeschool Daze
- Pingback: Nature Play Activities and Environments for Children
- Pingback: Spring has Sprung! | Science in Storytime
- Pingback: Ultimate Boredom Buster: 101 Things to Do When Kids Are Bored
- Pingback: Ideas for Home Learning #1 | The Outdoor Classroom @ Rhyl Primary School
Since we are getting to spring, a seed germination jar is a perfect activity. Thanks
Comments are closed.

Subscribe to receive a free 5-Day STEM Challenge Guide
~ projects to try now ~.

- Skip to primary navigation
- Skip to main content
- Skip to primary sidebar

- FREE Experiments
- Kitchen Science
- Climate Change
- Egg Experiments
- Fairy Tale Science
- Edible Science
- Human Health
- Inspirational Women
- Forces and Motion
- Science Fair Projects
- STEM Challenges
- Science Sparks Books
- Contact Science Sparks
- Science Resources for Home and School
Bean in a jar
April 30, 2012 By Emma Vanstone 13 Comments
This germination investigation is very simple but fascinating. Did you know you can grow a bean in a jar with just a little water? Germination is the sprouting of a seedling from a seed.
What is germination?
Three factors are important for germination .
Water – seeds need water for germination to occur. When a seed absorbs water, it starts to swell up, the outer coat of the seed cracks and roots start to grow through.
Oxygen – oxygen is needed for a plant to grow (oxygen is needed for respiration to occur ). Seeds buried too deeply in the soil won’t grow.
Temperature – the temperature can be important ( warm or cold ) depending on the type of seed.
Once a seedling has used all the nutrients from the seed, it then needs to take nutrients from the soil. Once your seed has germinated and grown a little bit, you’ll need to transfer it into a pot of soil.
Light is not needed for germination but is needed for a plant to grow.
Roots grow downwards to anchor the plant in the ground and find nutrients, and shoots grow upwards to find light.
How to grow a bean in a jar
What you need.
- A broad bean seed
- Kitchen roll or a napkin
Instructions
- Swirl a small amount of water around the jar.
- Fold your napkin or kitchen roll and place it in the jar ( we made the kitchen roll very slightly damp also ).
- Place the bean seed in the jar resting on the napkin.
- Spray some water on the bean every few days.
The bean should start to grow roots after a few days. This is called germination.

We kept one bean in the dark and one in the light. Both seeds germinated and grew into small bean plants. This shows that light is not necessary for germination .
You can see here that the plant grown in the dark is slightly less green than the one grown in the light. We have seen this before when growing cress .

What amazes me the most is that all this can grow from one tiny seed with no additional nutrients other than those contained in the bean itself.
After a few days in the light, the bean plant kept in the dark was as luscious a green colour as its counterpart.

Bean in a jar instructions
Download the instructions completely free.

More plant science
Little ones will enjoy growing a bean for Jack and the Beanstalk.
Inspiration Laboratories has a lovely plant science experiment growing seeds in different soil types , such as sand and stones.
Playdough to Plato has a gorgeous sprout house !
Another idea is to dissect a plant or try one of our other fun plant science experiments for kids .
Suitable for:
Key Stage 1 Science – Plants
Identify and describe the basic structure of a variety of common flowering plants, including trees.

Last Updated on March 29, 2023 by Emma Vanstone
Safety Notice
Science Sparks ( Wild Sparks Enterprises Ltd ) are not liable for the actions of activity of any person who uses the information in this resource or in any of the suggested further resources. Science Sparks assume no liability with regard to injuries or damage to property that may occur as a result of using the information and carrying out the practical activities contained in this resource or in any of the suggested further resources.
These activities are designed to be carried out by children working with a parent, guardian or other appropriate adult. The adult involved is fully responsible for ensuring that the activities are carried out safely.
Reader Interactions
April 30, 2012 at 8:52 am
You keep coming up with really inspiring ideas. Thankyou!
May 04, 2012 at 7:39 pm
So glad you like them!
April 30, 2012 at 12:53 pm
I love this idea. It is so much better than the ziploc bag on the window. (Maybe it is just me, but those always get so nasty. Plus it would be great to have where the students could see actually grow and record the height. Love it.
May 04, 2012 at 7:41 pm
oooh yes, what a good idea!
May 02, 2012 at 10:17 pm
It is fascinating and beautiful! We have to try this!
It was great! and so simple x
May 06, 2012 at 8:29 pm
We love this activity. Ours is growing strong and we’re going to try transferring into the soil and growing further now
Thank you for linking to Tuesday Tots this week
May 07, 2012 at 2:26 pm
love this idea.. will find some jars x
May 11, 2012 at 3:01 am
How fun!! I love the lessons where they get to see the roots that would be underground. Thank you for sharing at Sharing Saturday! I hope you are having a great week!
March 08, 2013 at 6:55 pm
Ooh great way to use my jars! Now to get some beans x
March 08, 2013 at 8:28 pm
We grew a bean in a glass Mason jar for each kid a couple months ago. Can you believe they ate still thriving? One even grew a bean pod with beans in it. I should transfer them to a pot with soil.
April 10, 2013 at 6:14 pm
I would like to know just why this works. Why is the one kept in the dark white? I know it has something to do with light. And why did it grow faster that the one in the light? Thank you!
April 23, 2020 at 10:28 am
Hi there, can you use any seed for this?
Leave a Reply Cancel reply
Your email address will not be published. Required fields are marked *
Growing Beans in the Classroom
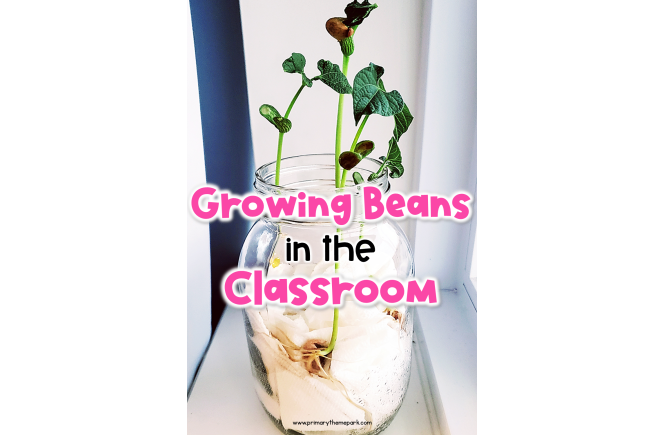
Nothing like setting up an experiment in the classroom and it not turning out exactly how you expected, right? Well, I’m here to share all my tips and tricks for growing beans in the classroom so your experiments are a success!
- dried beans (pole, bush, or lima beans)
- paper towels
- spray bottle of water
- clear glass jar or small clear plastic cup
My #1 Tip for Success
Before I go any further, I want to tell you the one thing I feel makes or breaks this experiment. It’s what will get you tall, lovely sprouts like the picture above in only ten days:
Soak the Beans in Water Overnight!
I can’t stress enough that you should soak the beans in water overnight beforehand. I’ve tried the experiment with and without soaking the beans. Soaking the beans boosts the germination process and you see roots in a day or two. Within ten days, the bean sprouts have a tall stem with leaves growing out of the top of the jar. When I’ve not presoaked the beans, it took five or six days for the first root to begin to emerge. Even then, the entire germination process seemed to go a lot slower.
Now that you’ve soaked your beans, let’s start the experiment!
- Fill the container about halfway with paper towels.
- Place several beans on the outside of the paper towels in the container so you can watch them grow.
- Spray the paper towels with water to dampen them.
- Place the container near a window or on a window ledge.
- Observe and watch the beans grow over the following days and weeks!
Can the Seeds Grow Without Soil?
We teach students that plants need water, air, sunlight and soil to grow. Some students may wonder how these seeds will grow without soil. It might be helpful to point out that you can germinate seeds, or help them start to grow, without soil. Why? It’s because the food the seed needs to start growing is inside the seed. The seed provides food for a short time and then you must plant the seedling in soil for it to continue to grow.
Experiment Variations
This experiment helps students learn the basic needs of seeds and plants. What happens if they don’t get what they need?
Prepare a few extra jars with beans and alter some of their growing conditions. Observe what happens.
- No water : Don’t soak the beans in water overnight or wet the paper towels in the container.
- No air : Use a sandwich bag for this one. Use a straw to suck as much air from the bag as possible before zipping it shut.
- No sunlight : Place the jars away from windows or even in a dark space like a cabinet.
- Not enough space : Place seeds in a group touching each other.
- No soil : Seeds will germinate without soil, but will they keep growing and produce fruit (beans) if left in the container with no soil? This will take a lot longer to observe. Another option is to plant the beans in sand. Give them water and sunlight, and observe what happens.
Growing Beans FAQs
What beans did you use? I used pole and lima beans. I’ve successfully germinated both kinds.
Do I need beans from a seed packet or can I used dried beans from the grocery store? While you may certainly use a purchased seed packet of beans, I’ve always had success germinating and sprouting dried beans I’ve brought at the grocery store. I recommend soaking and germinating a couple of dried beans at home to make sure your dried beans will work before doing it with your students.
How long will it take to see anything? One or two days if you soak the beans overnight, five or six days if you don’t soak them. I soaked my beans overnight and put them in a jar and baggie. The very next day I already saw the root coming out of most of the beans.
Can I do this experiment anytime of year? I think so! I live in the Midwest and germinated these seeds towards the end of January! Even though it was cold outside and the windows themselves felt cold, there was enough sunlight and warmth to begin germination. If you want to keep the plants alive or transfer them into a garden, you will need to begin germination closer to actual planting time.
What if the paper towels get dry? Use a spray bottle of water to moisten the paper towels if you feel they are too dry.
Can I germinate beans in a sandwich bag? Absolutely! Just place a damp paper towel and several beans in a zip-top sandwich bag and seal it. Then tape or place the bag on or near a window and watch them grow!
Students learn so much about plants by growing beans in the classroom. It’s really fun to watch the little beans grow so quickly. Sometimes there’s a huge difference from day to day. I hope these tricks and tips help you and your students become expert germinators!
More Plant Resources
Parts of a Plant Lollipop Activity
Parts of a Plant Painting
Plant Videos for Kids
Plant Unit for Kindergarten and First Grade
29 Comments
I really enjoy to see the plant growing.
hi this is cool info
Hey there! I am soaking my Lima beans to grow in our classroom and I noticed they are wrinkling and some of them are splitting. Is this normal? Thanks so much for your info! We’re excited to try it!
That’s a great question! The wrinkles are completely normal. As for splitting, when the inside of the bean rehydrates quicker than the outside, the bean will split. It happens sometimes. You can have students examine the split beans to see what’s inside the seed. Good luck and I hope your students enjoy growing their beans!
Hi, I’m a PreK teacher and have found the past several years, that the beans get moldy in the children’s ziplock bags. How can I avoid the mold?
That’s a great question! I might try doing it with glass jars instead of baggies. I’ve never had an issue with mold when growing them in glass jars like I shared in the blog post. I also leave the lid off to allow air circulation.
If you need to use bags, you might try leaving the top open or making a few holes near the top of the zipped bag. Another idea is to only leave the beans in the bags for just a few days and plant them as soon as you can.
I hope these ideas help! Good luck!
Hi Cara! Two easy tricks are 1) spritz rather than soak the towels in water 2) staple a horizontal row of staples about two inches down the bag and place lima beans along the staples before sealing. Veteran teacher tip—best of luck!
They need to wash their hands thoroughly before “planting”.
When do you put the bean in soil?
Hi! I plant them as soon they look like the one pictured with roots, stem, and a few leaves. They shoot up very quickly, so it’s not long before they’re ready to be planted.
Now that my granddaughter brought home her bean,what do we do with? A single plant. Does it need something to climb? Or will it get bushy? We weren’t given any follow up info sadly. HELP
That’s a great question! If you can find out what kind of bean it is, that would be helpful. Some beans are runners and need to be staked or have something to climb, while others don’t. Other than that, just plant it in soil and watch it grow!
I tried this experiment with my class and we have a few moldy plants. We wet the paper towel again every day. Does this mean the plants are dead?
Hi! If you do this experiment again, I suggest just lightly spraying the paper towel with water whenever it feels dry instead of watering them each day. If you soak the beans beforehand, they already have a good bit of water inside them. I also take the top off of the jar after they begin sprouting so air can circulate. Hopefully, doing those two things will stop the mold problem. Good luck!
Suggestions on the bean plant being towering over the cup? Do I need to get dowel rods? I feel bad because my kids are taking them home and I wanted them to be successful .
That’s a great question! Even though the plants stick up over the cup, they’re usually sturdy enough to send home. If you want to give them extra support, you might stick a straw in the cup and gently tie the plant to it. I hope your students have a great experience sprouting seeds!
hi im in 5th grade and when i grow up i will show my children this and might do this for their birthdays
If the seeds have mold, does that mean they are dead? Or can I salvage them?
Additionally, how do I safely transfer them to plant so that students can take home? Do I need a certain type of soil? A pot?
Hi, Alex! Those are great questions. First, if your seeds have mold, I would throw them out and start over. When you try again, here are my tips to avoid mold:
1. Just lightly spray the paper towel with water whenever it feels dry. If you soak the beans beforehand, they already have a good bit of water inside them so they don’t need lots of water. Too much water in the jar or bag will allow mold to grow.
2. Take the top off of the jar after they begin sprouting so air can circulate. If you use zip-top bags, open the bags after the beans sprout.
3. Avoid direct sunlight for long periods. Too much heat inside the jar or bag will cause mold to grow. The beans will still sprout near a window with indirect sunlight.
If you want to plant them for students to take home, use potting soil (not garden soil) and any small plastic container like yogurt cups, bottom half of a water bottle, or other small plastic cups you might have in your recycling bin.
I hope those ideas help! Good luck!
Will pinto beans grow?
Hi, Maria! I’m so sorry I’m just seeing your question! I’m not getting emails when someone posts a comment like I usually do, and I’m not sure why. I haven’t tried pinto beans because I’ve read they don’t sprout as reliably as other beans. It might be interesting for kids to try to grow pinto beans along with other types of beans to see which ones sprout the best.
I have jars without lids. Do I need lids to begin this process?
That’s a great question! You don’t need lids to begin the process. You might put plastic wrap or aluminum foil over the jar for the first few days. I think it’d be interesting for kids to observe a covered jar and one that isn’t. Then, they can see if covering the jar affects growth.
This activity is perfect for children who love to explore what is in store for them in the real world. Thank you so much for sharing this.
- Pingback: Parts of a Plant Craft - Primary Theme Park
- Pingback: Parts of a Plant Activity - Primary Theme Park
- Pingback: Plant Videos for Students - Primary Theme Park
- Pingback: Hurry Up and Wait….. – Lacey’s Learning Log
- Pingback: 25 Fun and Engaging Plant Life Cycle Activities for Kids - Teaching Expertise
Leave a Reply Cancel reply
Your email address will not be published. Required fields are marked *
Homeschool: Bean Germination Experiment

Take and Makes for this homeschool experiment for ages 6-12, will be available at area PPLD libraries starting this Friday, April 2, 2021.
Introduction:
How do seeds transform into plants? What happens when a bean seed begins to grow? Watching a sprout emerge from a dry seed is nothing short of miraculous. You will plant beans inside a plastic bag to watch roots form and leaves emerge right before your very eyes. You will also compare how beans grow in light and dark environments.
Supplies Included in Take and Make Kits:
- 2 plastic zipper storage bags
- 10 uncooked pinto beans (remove from bag)
- 2 paper towels
- Data Sheet for Light Experiment
- Data Sheet for Dark Experiment
- Bean House Template
Supplies from home:
- Water (in bowl or sprayer)
- Scrap paper to label beans with date
- Scotch tape or glue stick
- Pen or Pencil
- Crayons or marker
Safety Tip: Dried beans are chocking hazards for small children. Adults will need to supervise this activity.
For This Experiment:
- Experiment Light: choose a sunny window where the seeds will get plenty of light, but won’t be blasted by intense sun all day.
- Experiment Dark: Find a closed drawer or closet that is dark and not opened very often.
Directions:
- Fold paper towels so they will fit inside the bags.
- Dampen paper towels with spray bottle (not too wet!) and place inside bags. You will need to add water to paper towels when they dry out over time.
- Put 5 beans into each bag on top of paper towels (leave room between them to grow!) and zip closed.
- Write the date on scrap paper, label either Light or Dark, and tape to each bag.
- Color/decorate the frame of the Bean House Template with markers or crayons. Fold it in half lengthwise and use scissors to cut along the dotted lines (you are cutting out a large square). Tape the Light Bean Bag into the Bean House.
- Tape the Bean House (Light Bean Bag) to a window. Put Dark Bean Bag into a dark place.
Now you are ready to prepare your data sheets. Use the Scientific Method questionnaire on the back of each sheet to make predictions about how each bag of seeds will grow. Use the front sides of the sheets to collect data. You will make drawings and take measurements. Do this every 3- 5 days and see if your hypothesis for each bean bag comes true! Do the seeds grow the same in both bags? Can you think of other variables to try besides light and dark?

Observing Plant Growth, Beans in a Jar Stages of Development Experiment

With little kids growing a bean stalk in a jar just like Jack and the Beanstalk is a really fun simple science experiment. They can observe the roots growing see the shoot and more. But that same experiment can be used with older children to explore plant growth in more detail. Although similar to toddler experiment this one is aimed at observing the plant growth and stages of development in dicotyledon plants. So here we go plant growth experiment with beans in a jar.

What You'll Find on This Page
Beans in a Jar Growth Experiment for Kids
Beans are an ideal seed to use for this growth experiment with the kids and by using a glass jar instead of a pot you can observe the growth in situ from the first emerging root to the first real leaves.

This experiment takes place over a 2 week period and you will need to either have multiple jars set up so that you can compare the growth at the same time (as we demonstrate below) or remove, observe and journal as you go.
If you have younger kids then they can do this too – why not try our Jack and the Beanstalk Science Experiment .

Growth of Plants from the Seed
Plants need water to grow from a seed. The water is absorbed by the seed coating and that swells allowing the embryonic seed to emerge. The seed embryo has 2 points that develop and a large bean seed is ideal for showing these easily to kids.
First, the root tip grows and by geotropism (the process where the root grows down and the shoot grows up) it grows downwards. This root then divides at multiple points to allow more and more root development to let the plant take up the dissolved nutrients into the stem and to the leaves, flowers and fruit as needed.

As the roots develop the second part of the embryo starts to develop forming the shoot and the first leaves. On a bean these are the “seed leaves” and don’t look like the leaves of the plant.

Once these 2 leaves are formed the stem grows up between them and the first true leaves appear.

Seed Germination Activity Pack ~ $5.00
Project pack for kids to explore seed germination and plant growth.
Beans in a Jar Experiment
Observing this is so simple to do and is great for kids to record their observations as they go. You could even set up a camera and take images at regularly intervals and show the development using timelapse or stop motion type software that is free on most tablets and phones.
Materials Needed for this Plant Growth Experiment
- Bean Seeds (broad or runner beans)
- Paper towel
- Science Journal, notebook or Seed Growth Printable (available in the seed germination pack or free to subscribers below)
Setting up your Plant Germination Observation Jar
This is the method for observing all stages at the end. You will be repeating the stages at 3 day intervals so that you can have a number of stages to lay out and observe at the same time.
1. Place the paper towel in the clean glass jar.
2. On the outside of the jar between the paper and glass place 3 beans, we use 3 beans so that have the greatest likely hood of them growing.

3. Water the paper towel thoroughly
4. Place the jar in a light but not under direct sun area and keep watered.
5. After 3 days add in 3 more beans.

6. Repeat step 5 until you can observe the different stages from the seed casing swelling to the first 2 real leaves forming.

Recording the Growth
Whether you use our seed journal page from the activity pack above, our free to subscribers seed journal, notebook or science journal the process is the same.

Using a HB pencil draw the different stages of germination of the seed. The full stages are below but you can pick as many of them as you wish.

Stage 1 – Seed casing swelling and breaking
Stage 2 – Embryonic root emerging and descending
Stage 3 – Root development spreading out and forming branches
Stage 4 – Embryonic shoot emerging and the seed casing breaking apart
Stage 5 – First 2 seed leaves
Stage 6 – First true leaves of the bean formed

More Plant Science Experiments for Kids
Want to learn more about plants then try some of these other plant science experiments for kids

- Dissect a flower to learn about sexual reproduction in flowering plants
- Investigate how new plants can grow from old with a carrot top experiment
- See how plants drink with our Celery Plant Transpiration Experiment
Plant Science in the Rainy Day Mum Shop
Plant Growth Activity Pack ~ $5.00

Plant Cells & Photosynthesis ~ $5.00

Leave a Reply Cancel reply
Your email address will not be published. Required fields are marked *
Save my name, email, and website in this browser for the next time I comment.
This site uses Akismet to reduce spam. Learn how your comment data is processed .
How Wee Learn
Out of the box learning ideas, playful art, exploring nature, and simple living - that is How We Learn!
Seed Germination Experiment – The Results!
May 27, 2024 by Sarah
Have you ever used the mason jar method for a seed germination experiment?! It is so neat to watch a seed sprout and grow, and to see the root structure take shape. It also makes for an awesome seed germination experiment, comparing roots and sprouts and how quickly each grows!
In this blog post, I’ll share with you exactly how we set up our seed germination experiment, a Free Printable Seed Growth Tracker, AND the results with the best seeds to germinate with kids!

Seeds and Plants Family Unit Study
This seed germination experiment is one of the hands-on activities from my Seeds and Plants Family Unit Study .
If you’re new here, let me explain. This unit study, like all of our ever-growing library of unit studies, takes one big topic—Seeds and Plants—and breaks it down into ten manageable, bite-sized learning topics. This format gives you the freedom to dive into learning at a pace that works for your family.
Each of the ten topics included with a unit study contains everything you need for that topic, including:
- a curated YouTube video,
- suggested information to read,
- a “what’s happening” section,
- an interesting fact,
- a discussion question,
- literacy and math extension questions,
- and an ultimate-can’t-be-beat hands-on activity!
Perhaps you do one topic per day, perhaps one per week. Whatever suits your fancy! You can learn about seeds and plants and explore one of the 10 topics from start to finish in about 1-2 hours.
Printable Seed Growth Tracker
Within the Seeds and Plants Family Unit Study, your little ones will observe and document how their seeds grow with this Printable Seed Growth Tracker . You can grab it for FREE right here:
Seed Germination Experiment: The Set-Up
For this experiment, we’re going to germinate our seeds using the ‘mason jar and paper towel’ method. With this method, kids can see the seed sprout and the root structure form, giving them the real-life learning they need to understand what’s happening beneath the soil!
For your seed germination experiment, you will need:
- a glass jar
- paper towels
Instructions
First, we pushed sheets of paper towels, one at a time, into the glass jar. Once it was full, we added some water to wet it (dumping out any excess). Wetting the paper towel made room for a few more pieces to be pushed into the jar and then wet again (and again, dumping out any excess water). We made sure the paper towel was rather packed so the seeds would stay nicely in place next to the glass.

Next, we picked four seeds to germinate: beans, snap peas, cucumber, and swiss chard. We pushed each seed down the side of the glass jar and supported them with the wet paper towel when pulling our fingers out.

We added all four of our seeds to one mason jar, but you could also set up separate mason jars for each of your different types of seeds.
Finally, I labeled each seed so we could make observations and comparisons.

Seed Germination Experiment: The Results!
One of the reasons I love doing seed germination with kids is how quickly the seeds start to grow. For this seed growth experiment, our seeds started to root on Day 2! By the next day, there were sprouts, too. And by Day 5, three of our four seeds were growing strong!
These are the seeds that we chose to germinate:
- Swiss Chard
So, how did our four seeds compare?
Here is a little run down of our results, though yours may, of course, be slightly different.

Day 1 – Despite checking a gazillion times, nothing happened.
Day 2 – Snap Pea rooted.
Day 3 – Snap Pea started to sprout, and Bean started to root.
Day 4 – Bean started to sprout, and Swiss Chard started to root (though it was tricky to see!).
Day 5 – Snap Pea , Bean , and Swiss Chard were all rooted and sprouting.
Day 6 – Bean overtook Snap Pea for the tallest and strongest plant.
Day 7 – All growing strong! (Except for the Cucumber …)

We had the best success with snap pea and bean seeds. Both grew fairly similarly, easily, and strongly. The roots to the snap pea were a bit easier to see, but the bean seed looks really neat as it sprouts!
So, What’s the Best Seed to Germinate with Kids?
So, if I were forced to choose between a bean or a snap pea seed to germinate with my little ones, I would choose—after a long and restless night’s sleep debating the choice— Snap Pea!
The root system on a snap pea is really fascinating—and that is why I do seed germination for kids in clear jars with paper towels : so they can see the root system.
Truthfully, we didn’t do too many activities while we were observing our seeds sprouting. It was mostly casual conversations. But conversations themselves can be one of the most powerful learning tools of all!
We made predictions and comparisons, developed new vocabulary, and—most importantly—marveled at how miraculous the whole process is.
This is one of the simplest ways to introduce little ones to seed germination. You can keep it simple, or turn it into quite an all-encompassing endeavor! Whatever floats your boat. Our boats are currently floated in a shallow stream… some days, a puddle…
More Seed Activities for Kids
If you’re looking for more seed activities, be sure to check out these 35 Seed Activities for Kids . And if you’re feeling crafty, I have tons of Seed Art Ideas for Kids as well.
And if you would like everything planned for you, I encourage you to check out my Seeds and Plants Family Unit Study!
https://shop.howweelearn.com/products/family-unit-study-seeds-and-plants
I hope you find these seed activities helpful for you and yours!
Thank you for reading, my friend,
"Mom, you're the BEST!"
Get playful activities emailed each week. Subscribing is FREE!

April 4, 2014 at 3:32 pm
The fail-safe ones are my favorite! lol! I love that this is just a casual experiment that still puts the roots (pun not intended) of science in their minds! 🙂

February 11, 2016 at 10:52 pm
Really helpful for my sons science project. I appreciate you sharing a lot! Thank you. We aren’t finished with ours however it’s a little more complicated. But wanted to say again appreciate your share! Great job!

February 15, 2019 at 4:44 pm
We always had the best success with nasturtium seeds.

February 19, 2019 at 9:12 pm
Oh interesting Theresa! I have never tried sprouting these seeds. I will have to give it a go!

March 5, 2021 at 2:00 pm
Hi, Did you just fill the jar up with wet paper towels? really wet? or misted wet? I’m trying to figure out how the seeds sit against the side of the jar. thanks
March 8, 2021 at 10:51 am
Hi Christina, Great question! The trick is to really fill the jar all the way with paper towels. Rip them off one by one and shove them in the jar. Then add lots of water to wet them down and continue to fill the jar again with the paper towel, wetting them down and repeating until the jar is totally full. Then dump out the excess water and press the seeds in. We then water the jar every two or so days and dump out the excess water. Hope this helps! I actually have a video coming out with more details next week. I will be sure to link it here!

April 11, 2022 at 9:15 pm
Where can we find the video? Love this idea!
April 17, 2022 at 8:28 pm
Thank you so much! You can check out the video in this blog post: https://www.howweelearn.com/two-spring-learning-crafts-we-love/

April 11, 2021 at 10:35 pm
Where did you get your seeds? Is it something I can just get at any store? Thank you. I nanny and always looking for learning amd fun things to do with her.
April 12, 2021 at 7:23 pm
Hi Faith! Yes, any store at all. The dollarstore carries seeds as well. I hope you have fun!
April 11, 2021 at 10:38 pm
Also, where in the jar did you put the seeds? On the sides? Do I put the different types of seeds in different jars?
April 12, 2021 at 7:28 pm
Yes! Once the paper towels are stuffed in the jar you can just slide the seeds in between the jar and the paper towels. You can put them in different jars, or pop them all in the same jar. Anything goes!

April 16, 2022 at 5:56 pm
Radish seeds sprout really fast as well. I’m a teacher and I use a plastic glove ( the large ones that cafeteria workers use) and instead of paper towels I use cotton balls. One cotton ball and one seed for each finger. Dip the cotton ball in water and wring out the water so that its damp and not dripping. Hope this helps anyone and thanks for the seed ideas!
April 17, 2022 at 8:23 pm
Great tips, Lindzi! Thank you!

February 6, 2022 at 10:46 pm
Hi Sarah, I have done this with many students. I had over 1200 students come to our conservation days and we showed them how to do this. With so many kids buying packaged seed was out of the question, so I just bought a bag of beans from the grocery store and started the process the night before by soaking them overnight. Then the bean seed germinated faster. Also corn seed can be used. Neither need to be soaked but it does speed up the process.
Just found your site. I was looking for fun easy experiments for my grandson who is 3 years old. I taught science for 35 years but, have been away from it and needed some inspiration, you know that oh yea, that would be a great one for him to do. Thank you.
February 9, 2022 at 7:56 pm
What a great tip, Brenda! Thank you so much.
For every step of your journey

Shop Resources
Privacy Overview
Free Sample
Stars & constellations family unit study.
Wondering if Unit Studies are right for you? Get a FREE sample! It will be delivered to your inbox instantly, then you will be redirected to my shop where you can take a peek at the rest of the available units and bundles.
Each week, I send an email to my lovely subscribers with fun activities for children. You’ll also be the first to know when I’m offering an incredible deal. Unsubscribe at any time!
Free Printable
Let's take the mystery out of learning to read..
Check your inbox! Your free printable will be emailed to you immediately.
- Book Lists by Age
- Book Lists by Category
- Reading Resources
- Language & Speech
- Raise a Reader Blog
- Back to School
- Success Guides by Grade
- Homework Help
- Social & Emotional Learning
- Activities for Kids
Germinate Seeds and Watch Them Sprout on the Windowsill
No need for dirt in this gardening activity, your child will "plant" a bean in a plastic bag - then watch it sprout.
Get ready for gardening with this simple experiment that lets kids observe seed germination, minus the dirt!
Watching a sprout emerge from a dry seed is nothing short of miraculous. Plant a bean in a plastic bag to watch roots form and leaves emerge before your very eyes.
You’ll Need
- S mall plastic zipper storage bag
- Dried, uncooked beans, peas, or seeds
- Paper towels
Safety Tips and Hints
- Dried beans are choking hazards for small children.
- For this experiment, choose a window where the seeds will get plenty of light, but won’t be blasted by intense sun all day. If your windows are freezing cold, tape the bag to a clear glass or vase in a sunny spot indoors, rather than a window.

Step 4: Seal the bag part way, leaving an opening near the top so the growing plants can get some air.

Step 6: Read the section below, on the science behind the fun, to your child so that she knows what to look for as the seed germinates and grows.
The Science Behind the Fun

Dried beans and peas are seed that contain dormant (sleeping) baby plants. These tiny plants need signals to make them “wake up” and emerge from the seed. Germination is the name for the processes the plant goes through in order to sprout from the seed and form leaves.
Plants need special signals to germinate, including light, air, and water. Temperature can also play a role, which is why you don’t want to put your seed against a freezing cold window.
When a plant first sprouts, it gets nutrients from the seed. You can see the seed shrinking as the plant grows. As a plant matures (gets older), it depends on roots and leaves to collect the energy it needs. Once it reaches a certain size and uses up the nutrients in the seed, your window sprout will have to be transplanted into soil to survive.
Creative Enrichment
Record the beans’ germination by drawing and measuring them each day. Have your child make a science notebook and use it to record his observations.
What happens if you do the same experiment, but put one bag of beans in a window, and another one in a dark closet?
Plant more than one type of bean or seed to compare how quickly they grow.
You can find more experiments like this one at kitchenpantryscientist.com , and in my books Kitchen Science Lab for Kids (Quarry Books), Outdoor Science Lab for Kids (Quarry Books), and my upcoming book STEAM Lab for Kids: 52 Creative Projects Exploring Science, Technology, Art and Math (available wherever books are sold).
All photos © Kitchen Science Lab for Kids (Quarry Books)
Growing beans in a bag
An experiment to explore germination.
To grow beans in a bag is an experiment that helps children understand germination. It's easy to do, and the children will enjoy it.
Instructions
1. Place several damp, folded paper towels into a zip lock bag. Insert five staples about halfway up the bag. This will keep the beans in the right place so that there's room to watch the roots grow.

3. Place a few beans into the bag.

4. Tape the bag onto a wall or window. Add water as needed to keep the paper towel damp.

5. Watch what happens! About three days after planting the first roots appear...

A few days later: the stems start to push upward.

After ten days the leaves begin to peek out of the seed coat.

Two weeks: the first true leaves appear while the stem continues to grow and grow!

How tall will they get? (Larry is sure they'll touch the ceiling!)
Jessica has been a teacher for more than 15 years, focusing on the Early Years. Her passions are music and art.
Let's keep in touch

Request a catalogue
Sign up for our Newsletter
Science Fun
Blossoming Beans
- 1 pinto bean
- 1 Ziploc bag
- 1 paper towel
- Spray bottle for holding water
Instructions:
- Dampen paper towel with spray bottle
- Place wet paper towel in Ziploc Bag
- Place bean on top of wet paper towel
- Close Ziploc Bag
- Place Ziploc Bag in a warm, sunny spot
- Add water to paper towel when it dries out
- Observe your plant growing in 3-5 days!
VIDEO COMING SOON BUT YOU CAN STILL ENJOY THESE AWESOME EXPERIMENTS!
How it Works:
What’s going on? Germination! That means the plant is sprouting it’s roots. Awesome! Usually, you can’t see the roots sprout when the seed is under soil, but since there is no soil in this experiment you can see the whole process.
Extra Experiments:
- Prepare two bean plants, but put one in a sunny area and one in a dark area. Observe their similarities and differences and chart them down.
- Chart your bean plant’s growth each day using a ruler.
- After 2 weeks, move your bean plant to some soil. Don’t forget to water it and give it some sun!
EXPLORE TONS OF FUN AND EASY SCIENCE EXPERIMENTS!

SUBSCRIBE AND NEVER MISS A NEW SCIENCE FUN VIDEO!
previous experiment
Next experiment.
We're hiring California Climate Action Fellows in Stockton and Berkeley.
ESY Berkeley Teaching Staff Edible Schoolyard Project Berkeley, CA
- Life Sciences
Students will be able to:
- Identify and label basic root structures with appropriate terminology.
- Describe the process of germination using a narrative structure
- Observe and sketch a plant and hypothesize on the root structure of that plant.
- A computer, tablet or phone to watch the video
- Germination of a Bean Seed – Student Version
- A piece of paper or a notebook
- A pen or pencil
- Haiku Template
- Some colored pencils or marker
- Questions for Bean Plant Video
- Bean Time-Lapse Video
Before you begin
- Collect all the materials listed above.
- Included in a lesson is a downloadable student version of the lesson plan, which details all directions on how to complete the lesson.
- This lesson includes worksheets. If you are not able to provide students with paper copies of the lesson or if students do not have printers, please direct them to copy the worksheets onto a sheet of paper.
- For the worksheets that accompany this video we have provided fillable PDFs.
- Students will watch a time-lapse video about the growth of the bean seed. To view the video, students will go to https://tinyurl.com/ESYbean
Watch again and write
- Students will watch the video again and pause it from as needed to respond to a series of prompts.
- Students will write a haiku or short poem informed by their observations.
DRAW AND REFLECT
- Students will observe the plants and trees close to their home and sketch what they see while imagining the vast root systems below.
- Germinate: to begin to grow or develop
- Seedling: a young plant
- Root: the part of the plant that is usually below ground, affixes the plant to the soil and absorbs water and nutrients
- Taproot: a straight tapering root growing vertically downward and forming the center from which subsidiary rootlets spring
- Root hair: a hairlike outgrowth of a plant root
- Leaf: a flattened structure of a higher plant, typically green and blade-like, that is attached to a stem directly or via a stalk/stem
- Branch: a part of a tree which grows out from the trunk
- Trunk: the thick main stem of a tree from which its branches grow
- Stem: the main body of a stalk of a plant that gives rise to leaves and flowers
- Syllable: an interrupted segment of speech (e.g., “gar-den” has two syllables)
- Time lapse: a type of video or photography that shows a long time period quickly
- Extend this lesson by having students show a family member or friend their drawing. Then have them describe the different parts of the tree or plant. Finally, collaborate with that family member or friend to draw another plant together.

- Visit or Volunteer
Designed by Guts & Glory & developed by Giant Rabbit .
- Edible Education Curricula
- Edible Schoolyard Berkeley
- Edible Schoolyard Stockton
- Edible Education 101
- Alice Waters Institute for Edible Education
- Resource Library
- Network Map of Edible Education Programs
- Stories & Events

Investigation: What Factors Affect Seed Germination?

Introduction
In the spring, flowers begin to bloom and you may see sprouts in the garden. How do plants know when it's spring and when to grow? If a seed grew too early, it might be exposed to a harsh cold environment. If it grew too late, it might not have enough water to survive. The process by which an organism grows from a seed into a plant is called germination . The seed of a plant is the embryo, and it contains enough energy for the plant to survive until it is time to start growing. In some cases, these seeds can survive for years.
What triggers the seed to start growing? It varies by plant and by the environmental conditions where the plant grows. The giant sequoia trees of California require fire to germinate. This adaptation ensures that new trees will grow when there is an opening created by the death of other trees. If the seeds germinated without fire, the seedlings would be too shaded to grow.
Not all plants need fire to start growing, but most do take the cues from the environment. In this activity, you will investigate factors that can affect the germination of a seedling.

Part 1: Consider a Question / Hypothesis
Several variables might affect the germination, these variables include: light, temperature, water, soil type, air quality.
Choose ONE variable to investigate. Write a hypothesis below. Remember, that the hypothesis should be a complete sentence that can be tested.
Part 2: Design an Experiment
With your lab group, determine how you could test the variable.
What kind of data will you gather? Will you have a control group? What kind of materials or equipment will you need? How many seeds will you use?
Available Materials ( other materials may be available, check with your instructor ): radish or bean seeds, ziploc bags, paper towels, window/sunlight, water, vinegar, soil, refrigerator
Sketch or describe your experiment below. Your instructor will approve your plan before you set it up.
Part 3: Gather Data
Most seeds will germinate in a few days. Plan to make observations over the next few days and organize your observations below. Be as detailed as you can about what you see.
Part 4: Publish Your Results
Create a lab report or infographic that includes the following information from this investigation. You have written things down on this paper, now it is time to organize the information into a formal report. This report should include four detailed sections.
1. Introduction : includes background information about the lab and your hypothesis
2. Experimental Design : include a drawing and/or description of how you set up your experiment
3. Data : Organize observations into a data table
4. Conclusions : Use your data to answer the experimental question. Be specific in how you write this, your conclusions must follow your data, even if they didn't turn out as you were expecting.
5. Reflection : In this section, discuss how your results may provide insights into how the environment can affect plants in general and how this information can be useful to humans. For example why would farmers need to consider germination factors when planting crops?
| Excellent 3 pts | Good - 2 pts | Needs Work - 1 pt | |
| Question/Hypothesis | written as a complete sentence, question is restated as a prediction that can be tested | Unclear phrasing, does include at least one question and answer | question is not answered, hypothesis not stated in a way that can be tested |
| Design | the procedure will accurately test the hypothesis, can be followed easily, materials listed or described | procedure does test the hypothesis, parts are unclear or may not fully test, some materials are listed | procedure likely will not test the hypothesis as stated, procedure unclear, materials not listed |
| Data | Clearly shows the all results of the experiment and includes a time frame, descriptors and any quantitative data taken, well organized, | Shows some results with some time frame and descriptors, organization lacking or hard to follow | results missing, hard to follow, only addresses part of the experiment, lack of organization |
| Conclusions | Summarizes the essential data used to draw conclusions; conclusions follow data (not wild guesses or leaps of logic), the experimental question is answered | Summarizes data, answers some of the experimental questions, includes a reference to the data | Does not answer question or summarize data, does not follow data or contains major errors in reasoning |
| Reflection | Provides a thoughtful opinion about how this information can be useful to scientists, farmers, or humans | Attempt to reflect upon the experimental results and its uses | Does not provide coherent reflection |
Other Lessons on Plants
Investigation – Rate of Photosynthesis – using baking soda, elodea and light, measure the bubbles to observe how fast a plant photosynthesizes and releases oxygen
Investigation – Algae Beads and Photosynthesis – use algae cultures and sodium alginate, measure photosynthesis by changes in color of indicator
Investigation: Photosynthesis – this lab uses leaf disks that float to indicate photosynthesis. Students investigate factors that affect photosynthesis. (AP Lab)
Investigation: Photosynthesis and Plant Growth (virtual) – use a virtual app to show how plant growth changes in response to light color and light intensity
Investigation: Separation of Plant Pigments – use chromatography to show how leaves contain pigments that separate
Classroom Project: 10 Easy Growing Beans For A Science Experiment
reviewed by Truman Perkins
With the advent and revamp of the education system, the classroom has become the area of exploring new horizons. New and more engaging activities are provided to the students in schools to make them learn more about the environment that is waiting outside for them. Not only academic but creative forte is established through these activities.
One of these innovative activities is enlightening students about nature by a one on one interaction with it. Science experiments using plants are well-known.
However, the best part for students is to be able to get hands-on practice and interplay between the students and nature. A practical and entertaining way to accomplish this is to grow bean plants in the classroom.
Beans are perfect for growing indoors, and one can see them sprout from a seedling giving the children all the amusement and excitement they need.
The most natural experiment which can also be performed with preschoolers is growing beans in a bag. The best seeds for this experiment are Pinto beans, Mung beans, Lentils, and Lima beans.
- Pinto beans
- Lentils and Lima beans
- Snap Bush Green beans
- Yellow beans
- Pole beans, Yardlong beans, and Runner beans
- Recommendation
Easy Growing Beans

1. Pinto beans

They are one of the fastest-growing beans, which makes it even better for growing in a classroom. Pinto beans are one of the most widely consumed staple foods in Northern Mexico and the US.
It takes around 90 days for Pinto beans to grow. A zip back is first tied to nails onto the window facing the sun directly.
Dried Pinto beans are then placed inside the bag with a wet or damp paper towel. After some days, we will see the beans sprouting.
2. Mung bean:

They are also known as green gram or moong, or maash is widely used in Southeast Asian households. The fascinating part about Mung bean is that it can be grown in a bag indoors. We can grow Mung beans in a hemp sprouting bag after soaking the seeds and prepping the bag for germination.
After putting the seeds in a wet bag, rinse and drain the bag at least twice or thrice in one day. With each rinse cycle, look for spouting of the seeds.
3. Lentils and Lima beans

These can also be germinated in a bag in classrooms, and their progress will be a visual delight for the school children. The students can help participate in every step of the sprouting.
First of all, ask them to wet a paper towel. Then wrap some seeds in the middle of the damp cloth and cover the second time. Put the seeds wrapped in the towel in a transparent ziplock bag.
Now ask the children to find the right sunlight spot to place the container, facing the sunlight directly. Ask them to check on the beans every day to see sprouting and then harvest their efforts after about 60 days.
Also, Lima seeds are more abundant, which makes it easy for little hands to grasp them.
4. Snap Bush Green beans:

A bean that is best to grow for a science project is Snap Bush Green beans. They require warm climates. Seeds germinate in 4 to 10 days in a pot, which contains the right mix of soil and fertilizer.
After the seeds germinate, the students can take them home to plant in their gardens. This is a great way to help them care about nature, and they will feel as help in assisting mother nature.
5. Yellow beans:

Yellow beans are an excellent choice for doing science projects. The seeds germinate in less than two weeks. But an interesting experiment can be carried out with the children.

Divide the children into two groups. One responsible for bean seeds in sunlight and the other for darkness. Half the seeds are placed in a sunny spot while the other containers are covered with cardboard, so no light reaches them.
It is an excellent way of teaching young students that light plays a vital role in the germination of seeds and for overall plant growth.
6. Soybeans:

If the time is short, then Soybeans are the best variety to explain germination in a classroom. Small pots can be used for this in addition to bags, mix soil with fertilizer, and place the seeds in between.
Water thoroughly. The seeds germinate within 48 hours, and the radicle emerges from the seed. In the next 7 to 10 days, small cotyledons appear, which appear as leaves.
7. Fava beans:

Another variety of Shell beans that can be grown in classrooms and science projects is Fava beans.
First, prepare a pot with soil and fertilizer and then place the bean seeds 4 to 5 inches apart from each other about 1 inch deep. Water thoroughly.
Germination time is 7 to 14 days. The students can see the emerging radicle from the seeds. It is better to use transparent glass containers for easy visibility.
8. Pole beans, Yardlong beans, and Runner beans:

A fun and interactive experiment are to determine the germination rate of different seeds. We can take a transparent zip-lock bag. Make columns on the bag with a permanent marker.
Place a damp towel inside the container. Now ask the students to put different types of green beans inside the bag within each column, including Pole beans, Yardlong beans, and Runner beans.
Now place them in a spot with direct sunlight. After 5 to 7 days, check for germinating seeds. Ask the students to note which seeds sprout first, second, and third.
Conclusion:
These experiments provide the student's opportunity to learn by understanding and seeing the results instead of cramming. It also instills in them the sense of leadership, and they consider themselves equal participants in every classroom project.
After the process of germination starts, the seedlings can also be given to students to take to their homes and care for them further.
Recommendation:
10 High Oxygen Producing Aquarium Plants
Rice Water for Plants to Get Maximum Growth
How to Grow Leafy Vegetables in Pots at Home?
How to Attract Parrot to your Garden & Balcony?

About Truman Perkins
Comments for "Classroom Project: 10 Easy Growing Beans For A Science Experiment"
Check These Out
Get new FREE Gifts . Or latest free growing e-books from our latest works.
Disable Ad block to reveal all the links. Once done, hit a button below

Germination: Planting Beans
Hands on science activity for students who are blind or visually impaired involves planting and observing beans.
- Share on Twitter
- Share on Facebook
- Share on LinkedIn
- Share on Pinterest
Planting MANY bean plants will address Life Science standards for most grade levels. Planting the bean seeds at intervals or for several days, will give ALL students the opportunity to observe the life cycle of a bean plant, the effects of environmental conditions on a plant, and similarities and differences in plants of the same species. Even when plants are grown on the same day, at the same time, and with the same variables, they will not all grow at the same rate or as well (in reference to height, number of leaves, flowers, and bearing fruit). Natural variations in growth provide opportunities for observation, discussion, and argument based on evidence. I have included teacher visual demonstrations for a class of varying degrees of visual abilities. Modeling the activity is a very important first step for all science lessons and for all students. When the teacher models the lesson while reviewing the procedure, any last minute changes can be made as needed by the classroom teacher as well as the TVI (teacher of the visually impaired). If there are only one or two students with visual impairments in the class, the TVI should allow the student to feel each material as the teacher demonstrates and explains the procedure to the class. Ideally, the student’s TVI will have a matching set of the materials. When additional materials are not available, the classroom teacher can pass the materials to the TVI, who will pass and explain or describe the materials to the student with visual impairments. The student does not need to complete the lesson at this time, just become familiar with the materials they will be using. Exposing the student who is visually impaired to the instructions and materials prior to a science activity reduces confusion, reluctance and anxiety when encountering a new experience.
Safety Concerns:
- Remind students not to put any materials in their nose, ears, or mouth.
- Keep their hands away from their face until their hands are washed.
- Use “wafting” or open hand, technique to smell materials when given permission to smell.
- Goggles or glasses may be used to prevent accidental eye injuries.
- 30, 6 oz clear plastic cups for planting
- 5, 3 oz cups, to hold seeds
- 5 containers to hold gravel (2-4 liter)
- 5 containers to hold soil (6-8 liter)
- 5 lb. bag of small gravel
- 4 lb. bag of soil
- 5 measuring spoons (tablespoons)
- 5 small vials or cups (1 oz. or 30 ml)
- 5 containers to hold water (1 liter bottles)
- Stack of newspaper
- 60 bean seeds (50 for students, and 10 for teacher demonstration)
- Water spray bottle
- Dated labels in braille, raised numbers and large print for each cup, dated the seeds are planted.
- Note: When working with students with visual impairments, using different size or shape containers for each material helps students follow directions with greater independence.
Preparation
Teacher Preparation: prior to EACH class, for five days
- Place 2 seeds in each of five small cups (petri dishes work well).
- Place at least 5 cups of soil in each of 5 large containers.
- Place at least 10 Tbsp. of gravel in each of 5 medium containers.
- Fill 5 bottles of water.
- Organize the trays: each tray will have 1 plastic 6 oz. cup, a container of gravel, soil, and seeds, a bottle of water, a vial and a tablespoon.
- Cover the tables with newspapers, for easy clean up.
- Date the cups with labels.
- Note: A sixth tray could be prepared as the teacher’s demonstration tray, or the teacher could use one of the group trays and replace materials as needed.
MODEL: Demonstrate the “Student Planting Procedure” to the whole class.

- Place two tablespoons of gravel into the bottom of the plastic cup.
- Place four tablespoons of soil on top of the gravel.
- Place two bean seeds to the top of the soil.
- Place two tablespoons of soil on top of the seeds.
- Pour two vials of water on the soil.
- Place the planted seeds near a window.
- Observe plant growth over the next couple of weeks.
- Water with spray bottle daily.
- Note: Do not write student names or groups on the plants. This is a class/team project. Many students become upset or disappointed if “their” plant does not grow. Remind students: “Scientists usually work in groups or on teams.”
Teacher Preparation:
Repeat the planting procedure every day for five days. There should be about 30 plants after five days. After two weeks, Teacher separates some of the plants from their soil. For each group, provide students with different germination stages, starting with youngest to oldest, or smallest to tallest. PURPOSELY select, 1. a seed with just a root, 2. a plant with leaves and seeds still attached, 3. a plant with roots, stem and leaves, 4. a longer plant with larger leaves.
Although these are different plants, the teacher is creating a live model for germination of a bean plant. This will allow the students to explore the changes a bean plant goes through during the growth process.
- Set up a planting station or activity center. Have a different group plant five plants each day for five days.
- Assign jobs for each student in each group, every day, for five days. One student measures gravel, one student measures soil, one student places seeds and one student measures and pours water (based on skills and abilities).
- Have students replant the seedlings in larger containers or a school garden and continue to observe until fruit grows and harvest the seeds.
- Each day place one or two plants in a cardboard box and compare plants growing with “Sun” to plants growing with “No Sun” conditions.
- Each day, plant seeds with “No Water” and compare their growth to the plants “With Water” conditions.
NGSS Standards:
- PreK-LS1-1(MA) . Compare, using descriptions and drawings, the external body parts of animals (including humans) and plants and explain functions of some of the observable body parts.
- PreK-LS1-2(MA) . Recognize that all plants and animals grow and change over time.
- PreK-LS2-1(MA) . Use evidence from animals and plants to define several characteristics of living things that distinguish them from non-living things.
- K-LS1-1 . Observe and communicate that animals (including humans) and plants need food, water, and air to survive. Animals get food from plants or other animals. Plants make their own food and need light to live and grow.
- K-LS1-2(MA) . Recognize that all plants and animals have a life cycle: a. most plants begin as seeds, develop and grow, make more seeds, and die; and b. animals are born, develop and grow, produce young, and die.
- 1-LS1-1 . Use evidence to explain that: a. different animals use their body parts and senses in different ways to see, hear, grasp objects, protect themselves, move from place to place, and seek, find, and take in food, water and air; and b. plants have roots, stems, leaves, flowers and fruits that are used to take in nutrients, water and air, produce food (sugar), and make new plants.
- 1-LS3-1 . Use information from observations (first-hand and from media) to identify similarities and differences among individual plants or animals of the same kind.
- 3-LS3-1 . Provide evidence, including through the analysis of data, that plants and animals have traits inherited from parents and that variation of these traits exist in a group of similar organisms.
- 3-LS3-2 . Distinguish between inherited characteristics and those characteristics that result from a direct interaction with the environment. Give examples of characteristics of living organisms that are influenced by both inheritance and the environment.
- 4-LS1-1 . Construct an argument that animals and plants have internal and external structures that support their survival, growth, behavior, and reproduction.
- 5-LS1-1 . Support an argument with evidence that plants get the materials they need for growth and reproduction chiefly through a process in which they use air, water, and energy from the sun to produce sugars and plant materials .
- Sprouting Bean Shape Book
By Selma Walsh
Return to Accessible Science main page .
Keep reading

Spill the Beans

The Germinator
Choose an Account to Log In

Notifications
Science project, growing dried beans.

Grade Level: 3rd - 6th; Type: Life Science
To determine if dried beans from the grocery store can be grown.
The purpose of this experiment is to find out whether the process used to dry the beans we eat for food renders them unviable. This experiment can be performed on any variety of store bought legumes.
Research Questions:
- What is the process by which green bean seeds are dried?
- What is the process by which pinto, white, or other store bought beans are dried?
- How long do bean embryos survive when dried for planting?
- How long do dried beans intended for eating last?
- Why do beans need to be rehydrated before eating or planting?
- How are beans pollinated?
Before they are packaged as seeds for planting, many fresh seeds must be dried out under specific conditions. Green bean embryos, which are the same part of the bean plant that we eat when we eat pinto, white, or other beans, are one such seed. Relatively easy to grow, green beans must first be soaked in water overnight before they are planted in soil. Dried beans must also be soaked overnight before they are eaten. By drying these and other legumes prior to storing, beans can be eaten long after they are harvested and also planted in the next year’s growing season. If the drying process used in beans intended for food does not kill the dormant embryo, these beans should grow into adult plants that will be able to produce more beans.
- Green bean seeds (to use as a control)
- Dried pinto, white or other beans
- 4” Planter boxes
- Potting soil
Seeds and potting supplies can be picked up at a hardware store or plant nursery. Experimental dried beans can be purchased at a grocery store.
Experimental Procedure :
- Soak all beans overnight (about 4-6 of each type).
- Fill potting containers with loose soil.
- Label two of the containers “Green Beans.”
- Label two of the containers with the type of beans you selected from the grocery store.
- If you are using a third type of legume in your experiment, label 2 more pots with the name of that type of plant.
- Make a 1” deep hole for each bean. You can plant up to two or three in each 4” container.
- Plant the beans in the labeled containers.
- Water and observe daily. Your plants will take a few days to germinate. Use a growth chart such as the one below to record plant growth.
Terms/Concepts: Dehydrate; Rehydrate; Germinate; Pollination; Cross-pollination; Embryo; Dormant
References:
Related learning resources
Add to collection, create new collection, new collection, new collection>, sign up to start collecting.
Bookmark this to easily find it later. Then send your curated collection to your children, or put together your own custom lesson plan.
Estimation of salinity stress tolerant level of chickpea cultivars (Cicer arietinum) using seed germination experiment followed by good agricultural practices recommendation
- Joshi, Jignasa B.
- Kavane, Aarti
Chickpea (Cicer arietinum L.) is an annual food legume, self-pollinated crop and belongs to the family Fabaceae. It is cultivated for its high protein content along with fiber, mineral and vitamins. Gujarat has the longest coastline in India and is about 1,600 km long. Soils of these coastline areas have salinity load and their concentration varies from region to region. Despite the importance of chickpeas and the huge coastal area in the state; there is no concrete researched scientific information on chickpea cultivation and its physiological behavior on Good Agricultural Practices (GAP) of the crop under salinity stress. Hence the present investigation had been aimed to evaluate the level of salinity stress of chickpeas by deploying seed germination experiments. Seawater samples were collected from the Arabian sea and nine different concentrations of seawater were taken to test the level of salinity stress for seed germination. It was observed that the highest seed germination rate was in 0% marine water i.e., 95.7% germination rate; which is at par with 1%, 2.5% and 5% marine water concentration. Decreasing trends in germination rate were noticed with the increase of marine water concentration and the least germination rate was 0% in the case of 100% marine water. It was concluded that up to 5% marine water, chickpeas can germinate, grow and cultivation may be possible; whereas, above 5% it is toxic to plants for germination and growth. As per our knowledge, this is the first-time report from the Saurashtra region of Gujarat, especially for GJG 6 cultivar. The resultant information may be helpful for coastal farmers of Gujarat towards Good Agricultural Practices of chickpeas.
- Cicer arietinum;
- Good Agricultural Practices;
- Salinity stress;
- Seed germination
IMAGES
COMMENTS
Bean Seed Germination Experiment. Facts about Beans . A bean seed will grow into a bean plant. The plant will produce blossoms that will turn into beans. If left to mature. The beans will contain 5-6 bean seeds that can be re-planted. Some bean seeds are white, red, brown, or black. We have even planted red speckled bean seeds.
Our seed germination experiment allows kids to see up close to how a seed grows and what would actually be happening under the ground! Learn about the steps of seed germination, and investigate what conditions a seed needs to germinate. Make sure to grab the free printable bean life cycle activity to go with your seed jar.
Swirl a small amount of water around the jar. Fold your napkin or kitchen roll and place it in the jar ( we made the kitchen roll very slightly damp also ). Place the bean seed in the jar resting on the napkin. Spray some water on the bean every few days. The bean should start to grow roots after a few days. This is called germination.
I've tried the experiment with and without soaking the beans. Soaking the beans boosts the germination process and you see roots in a day or two. Within ten days, the bean sprouts have a tall stem with leaves growing out of the top of the jar. When I've not presoaked the beans, it took five or six days for the first root to begin to emerge.
Seed Germination Experiment Worksheets. This set of educational worksheets for elementary school students complements the Growing Lima Beans in a Bag experiment. The worksheets provide students with a deeper understanding of the science concepts involved and include: Step-by-step instructions on how to conduct the seed germination experiment.
Put 5 beans into each bag on top of paper towels (leave room between them to grow!) and zip closed. Write the date on scrap paper, label either Light or Dark, and tape to each bag. Color/decorate the frame of the Bean House Template with markers or crayons. Fold it in half lengthwise and use scissors to cut along the dotted lines (you are ...
Place the seeds along one side of the bag, pressing them against the paper towel. Seal the bag tightly, and hang in a window using tape. Make sure the beans are visible on the side of the window where the kids will be observing their seeds sprout. Wait 24 hours. You should be able to see the seeds start to pop open and sprout after this time.
1. Place the paper towel in the clean glass jar. 2. On the outside of the jar between the paper and glass place 3 beans, we use 3 beans so that have the greatest likely hood of them growing. 3. Water the paper towel thoroughly. 4. Place the jar in a light but not under direct sun area and keep watered. 5.
It also makes for an awesome seed germination experiment, comparing roots and sprouts and how quickly each grows! In this blog post, I'll. Learn how to use the mason jar method for a seed germination experiment, plus which seeds are the best for growing! ... Next, we picked four seeds to germinate: beans, snap peas, cucumber, and swiss chard. ...
Growing beans in a bag is an easy and engaging spring science experiment for kids at home or in the classroom. Learn how to grow a seed in a ziplock bag and watch the bean sprouting and growing over the course of several days. This bean experiment will spark the interest of mini scientists of all ages!
For a pinto bean, its germination usually begins after four to five days. Plants need water and light to grow. They also need nutrients, and this is where your different plant misters come in. Nutrients are like vitamins for a plant; like food helps humans maintain the different processes that go on in our bodies, nutrients like nitrogen ...
Dried beans and peas are seed that contain dormant (sleeping) baby plants. These tiny plants need signals to make them "wake up" and emerge from the seed. Germination is the name for the processes the plant goes through in order to sprout from the seed and form leaves. Plants need special signals to germinate, including light, air, and water.
To grow beans in a bag is an experiment that helps children understand germination. It's easy to do, and the children will enjoy it. Instructions. 1. Place several damp, folded paper towels into a zip lock bag. Insert five staples about halfway up the bag. This will keep the beans in the right place so that there's room to watch the roots grow. 3.
Bean Seed Germination Graphing - Coordinate Grids (recommended for 5th grade and students with enrichment or extension needs) • For each experiment: 2-3 navy or lima bean seeds, soaked in water overnight. Small plastic zipper storage bag (transparent) Paper towel. Water. Tape. Space in a window, preferably one that faces the sun.
What's going on? Germination! That means the plant is sprouting it's roots. Awesome! Usually, you can't see the roots sprout when the seed is under soil, but since there is no soil in this experiment you can see the whole process. Extra Experiments: Prepare two bean plants, but put one in a sunny area and one in a dark area.
Summary: This lesson explores what happens below and above ground when a bean seed grows. Students will watch a video of the germination process of a bean and respond to a series of questions. Next, they will write a haiku or short poem about observations. Finally, students will observe the plants and trees close to their home and sketch what ...
Students investigate what environmental factors influence seed germination using beans. The experiment looks at moisture, light, acidity, and other factors that may affect germination. ... The process by which an organism grows from a seed into a plant is called germination. The seed of a plant is the embryo, and it contains enough energy for ...
Easy Growing Beans. 1. Pinto beans. Pinto Beans Germination In Classroom. They are one of the fastest-growing beans, which makes it even better for growing in a classroom. Pinto beans are one of the most widely consumed staple foods in Northern Mexico and the US. It takes around 90 days for Pinto beans to grow.
Procedure. Student Planting Procedure for each group: Place two tablespoons of gravel into the bottom of the plastic cup. Place four tablespoons of soil on top of the gravel. Place two bean seeds to the top of the soil. Place two tablespoons of soil on top of the seeds. Pour two vials of water on the soil.
Make a 1" deep hole for each bean. You can plant up to two or three in each 4" container. Plant the beans in the labeled containers. Water and observe daily. Your plants will take a few days to germinate. Use a growth chart such as the one below to record plant growth. BEAN GROWTH CHART.
Part 1: Seed germination (50 pts) 1. Problem statement: What factor has the most impact on germination of bean/ pea seeds? 2. Identify all of the variables for seed germination. Lastly identify which you chose to test and why. 3. Hypothesis statement - write your hypothesis statement clearly, be sure to address the variables and intentions
Beans and Peas. Green beans are common choices for science projects. They germinate dependably in 7 to 10 days and are easy to handle. The beans themselves also resemble beans that children recognize from their food, helping them learn what seeds are and how plants create them. Beans also produce a good-sized, sturdy shoot that's easy to use ...
The germination rate of dry beans decreases significantly with age and is impacted by storage conditions. Our research study demonstrated that it is possible for 29-year-old beans to sprout, but the germination rate of newer beans is significantly higher. In this post, we will share the results of our bean sprouting experiment.
It makes sense that vinegar could help seeds germinate. Some seeds, like okra, squash, and beans, have a harder outset shell than lettuce, radish, and spinach seeds.
The Dodgers are officially ending the Mookie Betts shortstop experiment. Manager Dave Roberts announced that when Betts returns from the injured list on Monday, he will be moving back to right field.
Some germination is known to occur during the process of fermentation in cocoa beans. The impact of this biological process on the course of cocoa fermentation is not known and was thus investigated. In order to determine the impact of germination at the molecular level as well as on flavor, an untargeted metabolomics approach using Ultra Performance Liquid Chromatography-Electrospray ...
1 Introduction. Guar bean (Cyamopsis tetragonoloba L.) is a Kharif crop belonging to the Fabaceae family and is mainly cultivated in tropical and subtropical countries (Kheto et al. 2023; Manikpuri et al. 2023; Kheto et al. 2024).In 2021-2022, the annual global production rate of guar was around 3.4 million MT, with India accounting for over 80% of total produce, followed by Pakistan, the ...
Vigna radiata (L.) R. Wilczek, generally known as mung bean, is a crucial pulse crop in Southeast Asia that is renowned for its high nutritional value. However, its cultivation faces substantial challenges due to numerous abiotic stresses. Here, we investigate the influence of salt and drought stress on mung bean genotypes by evaluating its morpho-physiological traits and biochemical ...
Hence the present investigation had been aimed to evaluate the level of salinity stress of chickpeas by deploying seed germination experiments. Seawater samples were collected from the Arabian sea and nine different concentrations of seawater were taken to test the level of salinity stress for seed germination. It was observed that the highest ...